This page /information does not apply to SLP SaaS. This information is provided for the SLP do it yourself plug-in only
WPSLP Power add-on uses the built-in file up-loader provided by WordPress Core instead of a custom file import script. Look in the Media Library in WordPress. Make sure your install has not disabled the default WordPress media up-loader.
NOTE: As of July 2018, if you are using the WPSLP “do it yourself” plugin with Power add-on and you have not included the latitude and longitude and require geocoding , make sure you have a Google API account and have checked off the Maps and Geocoding APIs in your library.
What to look for when importing
Do you see the CSV file you just imported? If not then your site has disabled the WordPress media uploader.
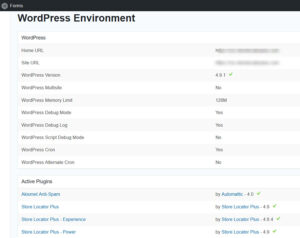
If your file IS in the media library but never gets past the offset “0” setting check to make sure your server has not disabled the WordPress Cron .
WP CRON can be found under Forms WP environment
Check to see if your server is preventing the wp-cron.php from being triggered.
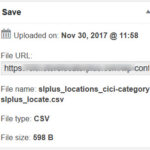
Check your import file in the media library by clicking on it. It should show what the file size is and the current offset. The offset is where the background process is shown while importing the file. If it is shown as “zero” then your WordPress Uploads directory for the media library has been set to non-standard restricted access meaning the background location import process is not allowed to open the file after it was uploaded.
Click on the file to see the file size and meta data
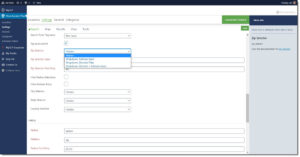
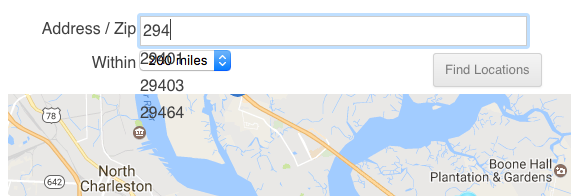
Feature to have the address to auto-complete the zip code based on your location database is available with the Premier/Enterprise or the Experience add-on
When 2 or more characters are typed in the address input box, input suggestions based on location data will appear.
None (default) – do not suggest address input.
Zipcode – suggest matching zip codes.
With Premier or SLP SaaS Enterprise you can also have a zip code drop down selector
If the formatting of the autocomplete is not the way you would like it to appear, reset the Search Form Style under appearance layout.
Locator Styling determines how the auto-complete drop down box will appear on your page.
Premier Members with an active subscription can restrict the number of locator queries that can be made by a single IP address. This feature can help prevent “location list theft” where a competitor uses the locator to scrape location information from a website or JavaScript query.
Note: In order to enable these settings you must enter your Premier Subscription user ID and Subscription ID under the General / Admin tab. When entered correctly the notice under “Add On Packs , Subscription Accounts” will tell you your subscription is validated. This feature is only functional while your subscription is active.
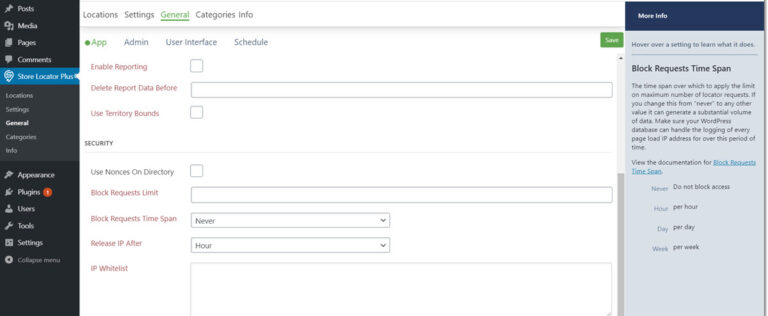
When your subscription has been validated you will see new options available to you under several Store Locator Plus tabs. The new Security settings will appear under the General /App subtab as shown below.
Block Requests Limit
This is the maximum number of location searches a user can perform within the Block Requests Time Span before their IP address is blocked from all locator requests.
This should be set to an integer value greater than 0.
The first page load request from an IP address is always allowed, even if this setting is 0.
If this is set to “2” and the Block Request Time Span is set to “Hour” the system will allow 2 location searches before the IP address is blocked.
The initial loading of the locator page will count as a “search” if you have the default “show locations at startup” enabled.
Changing this parameter will not release already-blocked IP addresses.
Block Requests Time Span
This setting determines over which period of time the locator request limit is checked. A user that has more than the Block Requests Limit number of locator searches performed in this time period will cause their IP address to be blocked from future location searches until their IP is “released” from the block list.
Setting this value to Never will disable the IP blocking system.
Changing this parameter will not release already-blocked IP addresses.
Release IP After
This is the maximum amount of time a request is “remembered” for a given IP address. Once this amount of time has passed since the most recent location request that triggered the block the IP address is “released” and once again free to perform location searches.
IP Whitelist
A list of IP addresses that will not be tracked by the blocker. This allows unlimited location lookups from these IP addresses.
Keep in mind that an IP address is not a unique “user” or “computer”. Many locations share an IP address such as a hotel or your local Starbucks. The limitations will apply to the entire group of users from the same shared IP address.
Once an IP address has been blocked, subsequent location requests are not tracked until the block has been released. This design lessens the server load in both volume of data stored and data I/O requests. It helps alleviate issues from possible denial-of-service type attacks where a bot loading requests in rapid succession could overwhelm the data storage and/or database I/O processing.
Blocking Locator Requests was added in the Premier Plugin version 4.7.11.
Search Form Style sets the styling for the interactive locator elements on your site. It uses pre-built jQuery Theme Roller style CSS designs to create a simple way to style interactive elements such as the autocomplete feature (available in WPSLP Experience or with MySLP Professional) on the address box. with Experience or Professional level plan additional search elements are available, including a one click checkbox to “Hide the search form” altogether.
The default styling is set to “None” which provides not special styling rules from interactive JavaScript elements in the locator interface. This allows the site designer to create their own styles for the website in which the locator will be placed.
Default styling for autocomplete is “none”. The theme in this example does not specifiy any ui-autocomplete styling. The background inherits the transparent background used by the website as the default for all divs.
The base service also includes the Base jQuery theme.
Setting A New Style
For WordPress plugin users go to the Store Locator Plus selection on the sidebar menu.
For MySLP users go to Store Locator Plus sidebar menu.
Select Settings/Search from the tab list.
Scroll down to the Appearance section and expand it by clicking the word “Appearance” if necessary.
Select a new style from the Search Form Style drop-down menu.
Available For WPSLP and MySLP
Search Form Style is a feature that is included in the base plugin of Store Locator Plus for WordPress and is available under Store Locator Plus for all levels of the MySLP service. Premier members on WPSLP and Enterprise Level users for MySLP will have multiple options for the Search Form Style.
Territory Bounds module was moved from the General | Data tab to the General | Server | Web App Settings section. Cluster Map Markers is useful for a large dataset in close proximity to each other on the map.
URL Control
A URL Control module was been added to the application for Enterprise or premier subscribers. Enabling this module will turn on the interface to allow additional data to be presented in a web page URL to impact how the locator behaves.
URL Control : Allow Location In URL
The first URL Control option is to pass a location ID in via a URL. Adding ?location=<id> to the end of a web page address that hosts the locator will cause the page to load with the specified location being highlighted as if the map marker was clicked. The default behavior is to show the info bubble for that location.
Results Layout ShortcodesThe Experience Add On allows you to custom tailor the look and feel of the Store Locator Plus plugin on your site. To accomplish this the plugin uses a combination of HTML and special shortcodes. These can be changed or checked off under the Settings* tab the plugin.
* formerly referred to as Experience tab, if you do not see Settings in the UI you are not using the latest version of Store locator Plus
The Overall Layout
This is set via the View / Layout setting. It determines the overall layout for the plugin based on 3 primary components: The Search Form, The Map, and The Results.
With the Power add-on you will find additional Bulk Actions under the Locations/Manage panel. There is a drop down menu under the Bulk actions tab that can be utilized to remove many, some or all tags associated with the location data. Check off which locations you want to remove the tags from, or you may check off all and select the filter to “Apply to all”
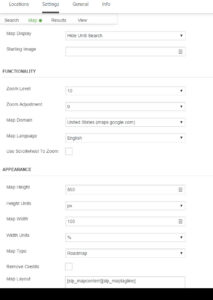
The Experience add-on for the WP Store Locator Plus or the MySLP/Professional Plan allows you to customize the way your Map is displayed and behaves.
With the WPSLP Experience add-on installed and activated go to Settings/Map.
Show Map (default)
Hide map until search
Image until search
Do not autozoom
Full Screen (With WPSLP Experience add-on or Professional level MYSLP)
Appearance
Additional options such as Hide the Map entirely or to change the layout are available with add-ons. (See Map layout and appearance WPSLP Experience Add-on. or if you have purchased the Professional and /or Enterprise level MYSLP SaaS . If you do not have the Add-on or the corresponding MySLP plan, the optional settings will NOT appear. (Note: With MYSLP there is a sidebar menu called Store Locator Plus/Settings where you will find the same. See Adjust Locator styling for more information)
The additional options with the above mentioned plans or add-ons allows you to hide the map , change the map layout, change the map bubble display, and/or hide the map info bubble. The Plugin Style under View (WPSLP) may supersede these settings. Choose one that will compliment your theme or utilizes the add-on features available to you.
Note: Major Updates to WordPress versions (example 5.0 , 5.5 ,5.7) may effect themes behaviors and plug-ins and cause additional errors. We strongly advise updating on a staging site or dev or test site first instead of allowing AUTO UPDATES)
Many times we hear that an update to SLP plug-in broke “everything”. Upon asking for clarification we find out that they also updated WP and/or other plugins or did not update their themes. WordPress explains how to use your browser to diagnose javascript error
Issues with the JavaScript part of the plugin usually manifest themselves by showing the search form but either a blank map, a map that is all gray, or a map that appears but search does not wor properly. To identify what is causing your issue use the Firebug add-on with Firefox or any Browser developer tools (see above info in the link to WordPress on how to diagnose with browser).
The WordPress Store Locator Plus map rendering is managed by the slp.js JavaScript file. It sets up the communication with the built-in WordPress AJAX handler, admin-ajax. Your server must be setup to allow the built-in WordPress AJAX handler to execute. Additionally, ANY PLUGIN or THEME that is breaking javascript will break SLP functionality. This is rarely an issue with the SLP plugin.
Common errors or issues:
The PHP JavaScript connector did not load
We have come across this error on several installations. The short answer to this problem is that something in the WordPress installation prevented the Store Locator Plus JavaScript component from loading. This means that the map system cannot communicate with Google. This prevents the map from appearing and search results from working properly on your locations page.
Here are some issues we’ve come across that cause this to happen:
PHP version is < 5.3, this generates an error message that you will not see in the browser. Any error message will prevent the JavaScript PHP file from loading. SLP will not work with versions lower then PHP 5.3.
PHP Error Reporting Enabled, if PHP error reporting is enabled and ANY PLUGIN has bugs, uses deprecated WordPress functions, or uses deprecated PHP functions they will generate an error message. This error message can be hidden in the browser if the error happens in something that is creating page header information. This will also break the page loading process and prevent the JavaScript PHP from loading.
Plugin Errors, any plugin that does not load properly and does ANYTHING with page header output will break and thus cause a domino effect prevent the Store Locator Plus PHP JavaScript component from loading.
In many cases the cause of the maps not loading is because our PHP JavaScript file could not load. We can often detect this and pop-up the “PHP JavaScript connector did not load” warning. However we cannot catch all errors. Why good Javascript is critical.
One of the best tools for searching for errors in the HTML page headers is to use Firefox with the Firebug plugin or any browser developer tool. Turn on the console and check the responses tab under console for any errors. We have resolved many client installation and map problems with this plugin. More often than not we are finding errors in other plugins, themes, or server/site configuration settings.
The PHP JavaScript page header is a critical part of a working Store Locator Plus installation. Since it loads very late in the page creation process it is susceptible to failures from almost anything else you may be loading on the page or your WordPress site. The the map is not loading and you are receiving this message get some page debugging/tracking tools like Firebug and isolate any plugins that are generating coding/output errors.
IF YOU Update your WordPress environment , BE SURE TO review the WordPress VERSION changes as they have changed.
2017 was the year WordPress was requiring hosts to have HTTPS available. Just as JavaScript is a necessity for smoother user experiences , updated PHP versions are critical for performance, and SSL just makes sense as the next hurdle users are going to face. Note: Google also weighs SSL as a search engine ranking factor and have begun flagging unencrypted sites in Chrome.