Set the Labels for the Search Form
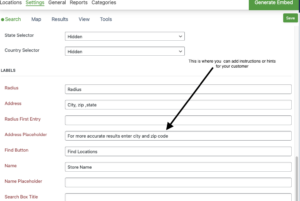
The label that will be displayed in front of the Search form box on your locator page can be changed under Settings/Search in the Appearance section Label. If none are set, a blank box will appear on your site. The “Address” Label you enter will appear in front of the search box. The “radius” information indicates to the site visitor that this is the radius (whatever radii you entered in the search form for radii options.
Consider this label as a help text tool for the site visitor to assist them as to what to enter in the box. Label Examples: zip code, city, street, or a combination such as address / zip code. The more detailed the better. We find address and zip code to be the most useful hint. If you leave this label blank nothing will appear in front of the search form box and your site visitors will be guessing what to enter to start their search.
Additional Search settings and labels are available with MYSLP Professional or Enterprise level or the WPSLP self managed with the Experience or Premier add-ons.
With the WP Add-ons or the MYSLP SaaS professional level plan and higher you will find additional help search boxes such as Address Placeholder.