Please check your versions on our Home site to ensure you are using the latest versions of the plug-in and add-ons. A lot has changed since release 4.9.2. See our News channel for latest information regarding WordPress, SLP, and Google changes. Changes to the terms for Google API use went into effect or or about June 11, 2018. This effected every plug-in that utilized Google APIs. Newer Versions of WPSLP added fields for Google API key placement. This means, if you had been using older versions in order to keep legacy add-ons, and never added your Google MAP API key to SLP, your map will not display correctly. See News for current information
Our MySLP locator service updates the versions for you and takes care of the Google Maps and geocode API s. You add your locations and adjust your map look-and-feel settings– then when you are ready paste a JavaScript snippet into your website. It doesn’t even need to be running WordPress.
The auto-update of WordPress v 4.8.2 and above required a major update to the WP Store Locator Plus free base plug-in resulting in the end of compatibility with the popular Pro Pack , Tagalong and other Legacy add-ons. The Legacy add-ons are no longer supported nor maintained and have been retired over the past two years as announced in news posts, blogs , changelogs, mail campaigns and social media. If you are not sure if your add-on is considered Legacy, see the FAQ comparison featured to Legacy add-ons
Time to invest in your future
Some of our customers were surprised by the change and retirement of the Legacy Add-ons. We tried to give as much of a heads up as possible using news blogs, content news to the home site and reached out using a Mail Chimp campaign for those most likely effected. Ultimately, there is no sure fire method to reach the thousands of customers who may have had these older add-ons installed. If there is one thing we know, change in the technical genre is inevitable. The SLP support team will always endeavor to help our customers transition to the new age. We pledge they will see real value-added from updating their site and software . Please take a moment to review the multiple benefits of utilizing the newer Experience add-on, Power add-on.
Although downgrading to an earlier version of SLP is an option, you may note that changes to the WordPress code and their security patches may disable features. Before making any changes to your site you should ensure you are backing up your site WP database and files. It is very important to take this step before you have issues or worse, site crashes. WordPress security has become more robust over the years.
For more information please see this important message from the author:
This page /information does not apply to SLP SaaS. This information is provided for the SLP do it yourself plug-in only
WPSLP Power add-on uses the built-in file up-loader provided by WordPress Core instead of a custom file import script. Look in the Media Library in WordPress. Make sure your install has not disabled the default WordPress media up-loader.
NOTE: As of July 2018, if you are using the WPSLP “do it yourself” plugin with Power add-on and you have not included the latitude and longitude and require geocoding , make sure you have a Google API account and have checked off the Maps and Geocoding APIs in your library.
What to look for when importing
Do you see the CSV file you just imported? If not then your site has disabled the WordPress media uploader.
If your file IS in the media library but never gets past the offset “0” setting check to make sure your server has not disabled the WordPress Cron .
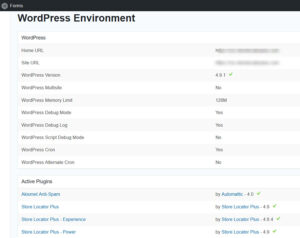
WP CRON can be found under Forms WP environment
Check to see if your server is preventing the wp-cron.php from being triggered.
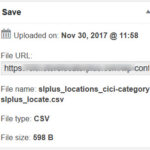
Check your import file in the media library by clicking on it. It should show what the file size is and the current offset. The offset is where the background process is shown while importing the file. If it is shown as “zero” then your WordPress Uploads directory for the media library has been set to non-standard restricted access meaning the background location import process is not allowed to open the file after it was uploaded.
Click on the file to see the file size and meta data
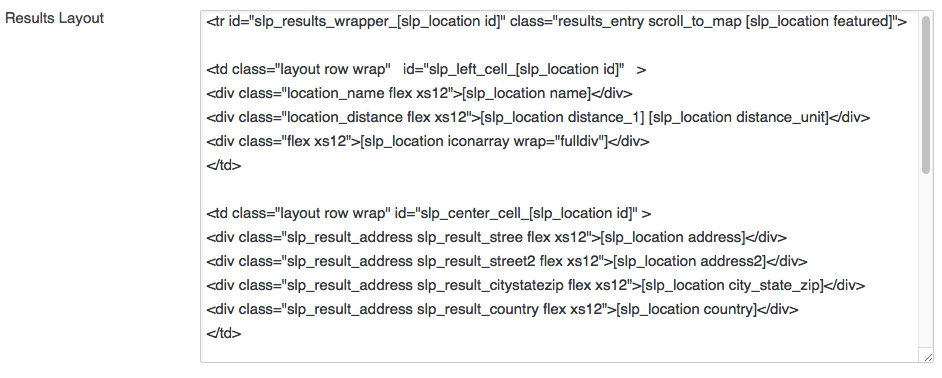
By adding the scroll_to_map class on any of the Results Layout HTML elements, WordPress Premier or MySLP Enterprise subscribers can enable the scroll to map functionality on any Store Locator Plus plugin style. When the class has been added to an element in the results layout that element becomes clickable. Clicking that element will scroll the map back into view and open the map marker and info bubble for the location that was clicked.
We have used this feature in the new Bennett plugin style.
To add the feature to other styles you will need to have the Premier plugin installed for WordPress. Under Settings/Map in the functionality section see the check box ,
For MySLP Enterprise users the feature is already enabled.
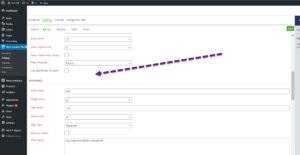
Go to Store Locator Plus (MySLP) or Store Locator Plus (WPSLP) | Settings | Results | Results Layout.
Results Layout With Scroll To Map
Edit the layout and add scroll_to_map to an existing class on an html element you want to trigger the scrolling feature or add class=”scroll_to_map” if the HTML element does not have a class assigned.
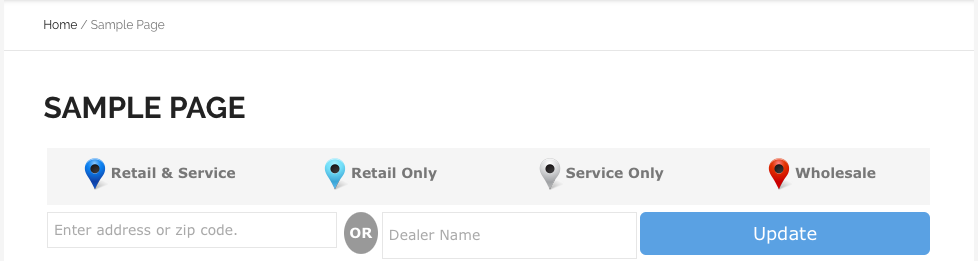
The category button bar is a category selection interface available to WordPress Premier and MySLP Enterprise subscribers. This feature is enabled under the Store Locator Plus menu select Settings | Search | Appearance | Category Selector.
The button bar will show clickable links that display the icon and category name for the category which will filter locations that match. The styling for the display will vary based on which plugin style you select. Currently the Bennett style from our Settings/View /Gallery CSS is configured to appear when you have an active Premier or Enterprise subscription.
Bennet Plugin Style with Button Bar
Functionality is based on a single-category selection. Clicking a new category will turn off all other categories.
The map center, either the Center Map for initial map loading or the address a user entered, is retained as is the initial or current radius. The map will zoom in-and-out to show all locations that match within the radius of the center point.
Shown is the button bar using the Bennet Gallery plugin style on a modified version of Exists theme deployed on the Bennet Trim Tabs site. This video is on our development servers.
If you want to keep the legacy add-ons, do not upgrade the base plug-in to version 4.7 or above. All individual legacy add-ons have been phased out and replaced over the past 2 plus years due to security patches, coding changes, WP updates, maintenance overhead and inefficiencies that were no longer viable to support. To find the match to your Legacy Add-ons, see FAQ: Legacy versus featured add-on
Please follow the SLP news feeds for important information about updates.
Even if you received a notice in your WordPress admin panel that an update to your base plug-in is available, you do not need to click the update button. All version updates to SLP are optional. We do not auto-update like WordPress does.
If you already updated (most likely if you are reading this) and now try to roll back SLP to earlier version to o retain the Legacy add-on compatibility.
Note: Due to the security patches required by Word Press you may also need to rollback WordPress. Before attempting to roll back or downgrade WordPress or any plugins , make sure you have a recent back-up of your site. Do not attempt this on a live site.
The SLP author does not recommend rolling back versions of any software or WP.This is time consuming and messy, requires technical savvy, and you will miss important security patches. If you are confident that you know what is entailed and are willing to take the risk; it is still recommended to use a back-up service such as Vault Press or Jet Pack.
P.S. If you do not want the headache of maintaining back-ups , updating, obtaining a new Google API, you may want to consider moving over to a My SLP plan. See MYSLP SAAS
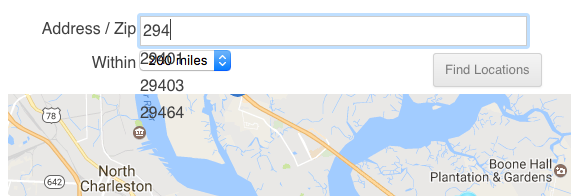
Feature to have the address to auto-complete the zip code based on your location database is available with the Premier/Enterprise or the Experience add-on
When 2 or more characters are typed in the address input box, input suggestions based on location data will appear.
None (default) – do not suggest address input.
Zipcode – suggest matching zip codes.
With Premier or SLP SaaS Enterprise you can also have a zip code drop down selector
If the formatting of the autocomplete is not the way you would like it to appear, reset the Search Form Style under appearance layout.
Locator Styling determines how the auto-complete drop down box will appear on your page.
This set of instructions will require you to be using the MySLP Professional level of service or higher. The Professional level includes the Experience add on that provides the Custom CSS rules interface. Instructions here are specific to MySLP but will work for WordPress plugin users as well.
Premier Members with an active subscription can restrict the number of locator queries that can be made by a single IP address. This feature can help prevent “location list theft” where a competitor uses the locator to scrape location information from a website or JavaScript query.
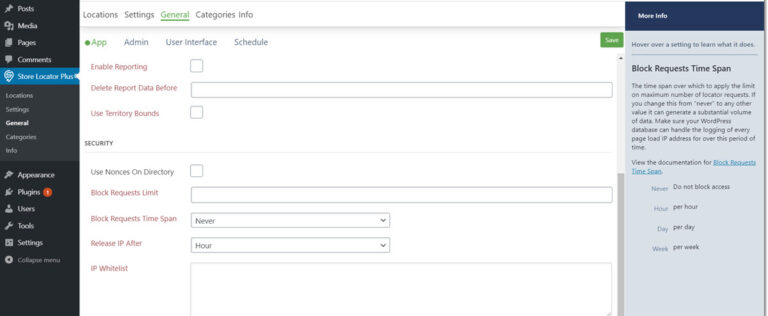
Note: In order to enable these settings you must enter your Premier Subscription user ID and Subscription ID under the General / Admin tab. When entered correctly the notice under “Add On Packs , Subscription Accounts” will tell you your subscription is validated. This feature is only functional while your subscription is active.
When your subscription has been validated you will see new options available to you under several Store Locator Plus tabs. The new Security settings will appear under the General /App subtab as shown below.
Block Requests Limit
This is the maximum number of location searches a user can perform within the Block Requests Time Span before their IP address is blocked from all locator requests.
This should be set to an integer value greater than 0.
The first page load request from an IP address is always allowed, even if this setting is 0.
If this is set to “2” and the Block Request Time Span is set to “Hour” the system will allow 2 location searches before the IP address is blocked.
The initial loading of the locator page will count as a “search” if you have the default “show locations at startup” enabled.
Changing this parameter will not release already-blocked IP addresses.
Block Requests Time Span
This setting determines over which period of time the locator request limit is checked. A user that has more than the Block Requests Limit number of locator searches performed in this time period will cause their IP address to be blocked from future location searches until their IP is “released” from the block list.
Setting this value to Never will disable the IP blocking system.
Changing this parameter will not release already-blocked IP addresses.
Release IP After
This is the maximum amount of time a request is “remembered” for a given IP address. Once this amount of time has passed since the most recent location request that triggered the block the IP address is “released” and once again free to perform location searches.
IP Whitelist
A list of IP addresses that will not be tracked by the blocker. This allows unlimited location lookups from these IP addresses.
Keep in mind that an IP address is not a unique “user” or “computer”. Many locations share an IP address such as a hotel or your local Starbucks. The limitations will apply to the entire group of users from the same shared IP address.
Once an IP address has been blocked, subsequent location requests are not tracked until the block has been released. This design lessens the server load in both volume of data stored and data I/O requests. It helps alleviate issues from possible denial-of-service type attacks where a bot loading requests in rapid succession could overwhelm the data storage and/or database I/O processing.
Blocking Locator Requests was added in the Premier Plugin version 4.7.11.
Search Form Style sets the styling for the interactive locator elements on your site. It uses pre-built jQuery Theme Roller style CSS designs to create a simple way to style interactive elements such as the autocomplete feature (available in WPSLP Experience or with MySLP Professional) on the address box. with Experience or Professional level plan additional search elements are available, including a one click checkbox to “Hide the search form” altogether.
The default styling is set to “None” which provides not special styling rules from interactive JavaScript elements in the locator interface. This allows the site designer to create their own styles for the website in which the locator will be placed.
Default styling for autocomplete is “none”. The theme in this example does not specifiy any ui-autocomplete styling. The background inherits the transparent background used by the website as the default for all divs.
The base service also includes the Base jQuery theme.
Setting A New Style
For WordPress plugin users go to the Store Locator Plus selection on the sidebar menu.
For MySLP users go to Store Locator Plus sidebar menu.
Select Settings/Search from the tab list.
Scroll down to the Appearance section and expand it by clicking the word “Appearance” if necessary.
Select a new style from the Search Form Style drop-down menu.
Available For WPSLP and MySLP
Search Form Style is a feature that is included in the base plugin of Store Locator Plus for WordPress and is available under Store Locator Plus for all levels of the MySLP service. Premier members on WPSLP and Enterprise Level users for MySLP will have multiple options for the Search Form Style.