You can do that with the Experience Add-on
Map Marker Tooltip
Map Marker Tooltip is a feature available to SLP Saas Enterprise level or WPSLP Premier Subscribers. The tooltip turns the map marker tool tips on and off. When on, the short name of the location appears when the the user hovers over the location marker.
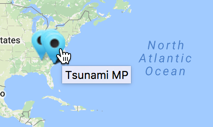
The default setting is on.
Uncheck the box to turn off map marker tool tips.
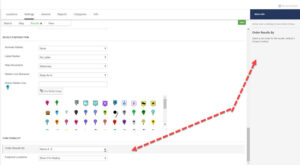
Set map view
You can change the built-in Google map view to any that Google has to offer “hybrid, road map, satellite (aerial), terrain” The settings are under Store Locator Plus/ Settings/Map ,scroll down to the section under Appearance and use the drop down under Map Type to change and then save changes.
If you are on MYSLP you will see the StoreLocatorPlus panel in the left admin panel, select settings/map.

[slp_directory] Shortcode for WordPress

MySLP SaaS Directories
Beta testing is currently underway for the MySLP SaaS version of the location directories. Since many deployment platforms do not utilize shortcodes, we have developed an alternate method for rendering the directory lists.
You can read about it on our Location Directory With MySLP SaaS post.

Power WordPress Plugin
Location directories , list of locations or states WITHOUT an interactive map, is possible in the buy-and-own WordPress plugins with the Power add-on.
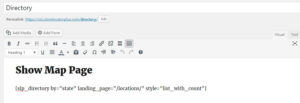 The [slp_directory] shortcode is used to place a directory listing on a page or post. There are two main modes of operation for the shortcode which is determined but the listing style selected. The list style is determined via the style attribute. The general layout of the Landing Page listings is based on the Results Layout that is set for the base plugin.
The two modes are “list mode” and “landing page” mode. These modes are described below.
How do I show two different maps with different locations on each?
Use the Power add on categories feature to differentiate the locations. Once your locations have been assigned categories you can use the only_with_category shortcode attribute to filter the results for each map.
Additional Layout Shortcodes with Power Add-on

If you have the Power Add-on in addition to the Experience Add-on you have additional fields that can be displayed with the use of shortcodes and attributes.
Contact Fields
The Power Add-on has Contact Fields that can be associated with your locations for adding internal special ids for updates or to add filters. The contact fields will not automatically appear in your results on the front end.
Importing Large Lists into WP Store Locator Plus
Hints for the WordPress Store Locator Plus stand alone, self managed plugin with Power add-on. Import features available with the Power Add-on
Load Data
If checked , use the faster MySQL Load Data method of file processing. Only base plugin data can be loaded, see the approved field name list.
This feature uses the MySQL Load Data command and is much faster than WordPress / PHP CSV file parsing, with the typical Google Geocoding limitations on performance and record counts (if you are not supplying, filling in the latitude/longitude data fields). This feature will only import basic location data. It does not import extended data fields or category data. If you use this along with per-entered latitude and longitude values you can import 100,000 locations in less than 10 minutes on a basic web server. The column headers must be included in the file and must match the basic fields. You do NOT need to include all columns.
Store Locator Plus Featured Add-ons versus Legacy Add-ons
Q: Can you help me identify the Store locator Plus add-ons that replace the add-ons now described as Legacy?
A: Power Add-on will deactivate and replace the following:
Adding Locations with additional features
If you have any of the Store Locator Plus featured Add-ons such as Power, Experience, or Premier add-ons , or if you have the MySLP Saas Professional or Enterprise level plan you will see additional sections when Adding (or managing) a Location.
You can opt to fill in all the rows and info that determine the Location and geocoding and hit Add button if you are done entering information. Or you can opt to continue to the next section, whether it be featured, tags, categories, or other functions that are in separate sections on the Location Add Tab.Click the “Add button” at the bottom of the next section instead.
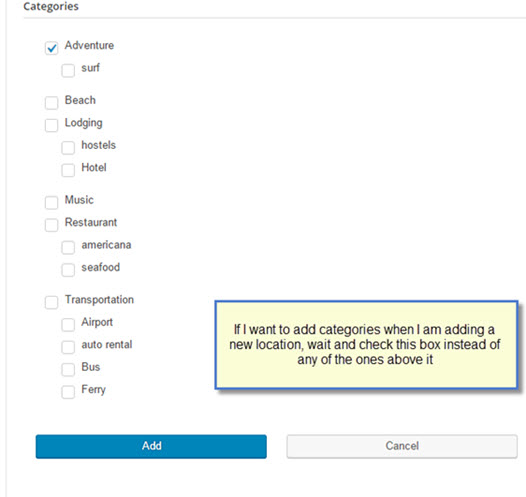
For example, I want to add a location that also is going to have a category assigned to it. I have the latest version of the Power Add-on activated. After adding all the Location information, I do not click on the Add button under the location information but continue on down to the next section called “Power” and add whatever pertinent information I wish to add there. Once I am satisfied and have no additional data to add, I click on the Add Button under the Power section of the Locations Panel to create the location that I have just added.
The category or other additional data you just associated will appear when you review the Locations Page.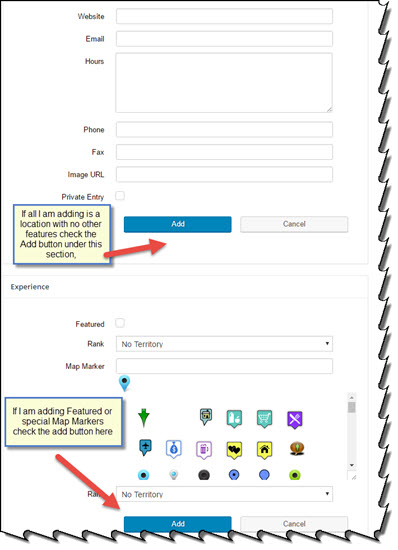
Results Order by display
The Store Locator Plus default is to show the order of the results below your map by distance, i.e. closest to the searched address listed first. With the Experience Add-on or the Premier Add-on the “order by” options allows you to display the results in a different order. With the Experience add-on (if you are using WordPress SLP) or the Professional Plan (if you are using the MySLP Subscription) the results order by options are under your Settings/Results/Panel
- Closest list the closest to the search address or center of the map (this is the default)
- A..Z- alphabetical sort of locations.alphabetical sort of locations
- Random- random order of locations, changes on each search
- Featured, Rank, Closest
- Featured, Rank, A..Z
- Featured, Closest
- Featured, A..Z
- Rank, A..Z
- Rank, Closest
Experience add-on allows you to change the order of the results