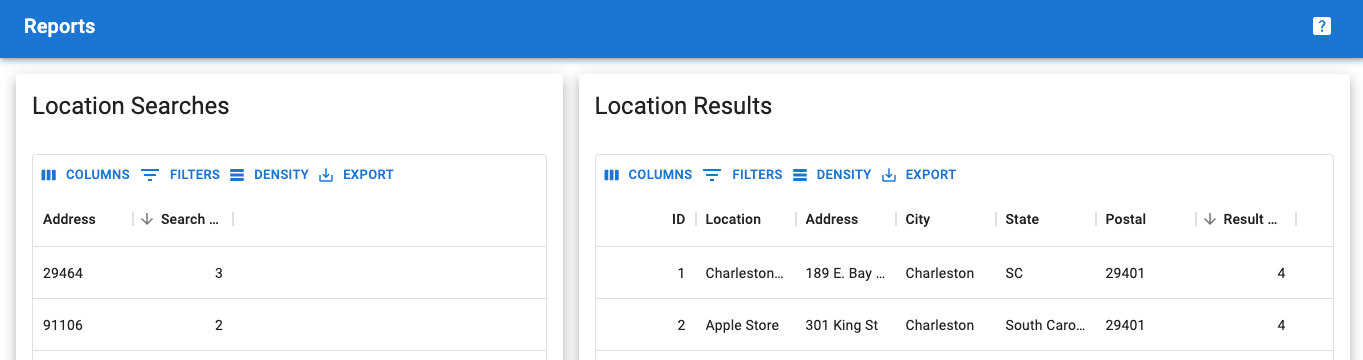
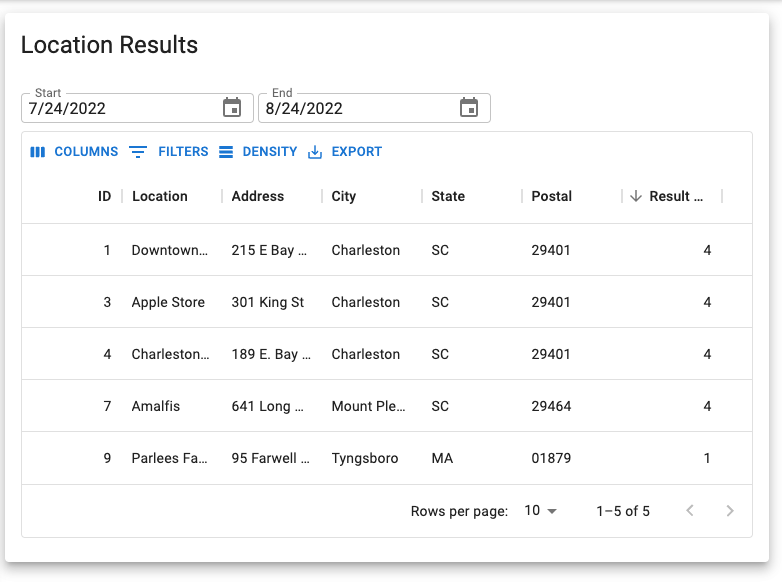
Location Results reports are included with the Professional or Enterprise plan. This report is designed to show the locations that were returned by users entering addresses on the search form when looking for locations. This can be useful for determining which locations are appearing most frequently for your site visitors.
To view this report you’ll need to turn on reporting features as outlined in the Reports documentation.
Location Results Report 2208.15+
This report will show up to the top 500 locations returned within the date range selected.
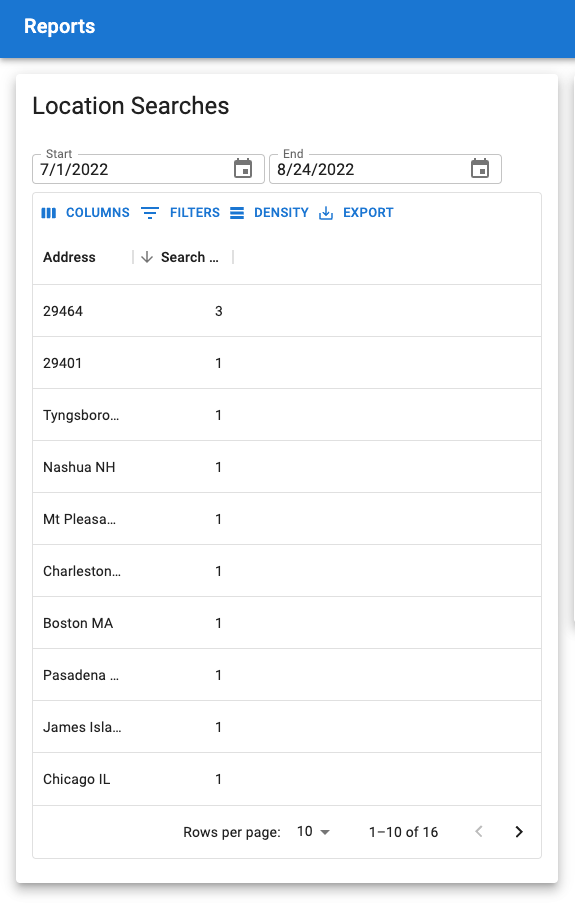
Location Search reports are included with the Professional or Enterprise plan. This report is designed to show what addresses users are entering on the search form when looking for locations. This can be useful for determining areas where your site visitors are looking for your product or service.
To view this report you’ll need to turn on reporting features as outlined in the Reports documentation.
Location Search Report v2208.15+
This report will show up to the top 500 searches within the date range selected.
WordPress environment is setup and configured including activation of the following plugins
Store Locator Plus®
SLP Power add on
In addition map service (Google API keys) should be in place and some locations should be added to the system.
A page has been created with the [slplus] shortcode present and the map is rendering properly.
Users are logged in as a WordPress administrator (the process will be slightly different for SaaS users).
Adding Categories To Locations
Objective
Create a location category and attach it to an existing location.
User Action: Add A Location Category
Click on Store Locator Plus® | Categories in the WordPress sidebar menu.
In the left “Add New Category Form”…
Type a category name. (Restaurant)
Click Add New Category
Result
The new category should appear on the category list on the page.
Category list after adding the restaurant category.
User Action: Attach Category To Location
Click on Store Locator Plus® | Locations in the WordPress sidebar menu.
Click the Edit action icon on the first location.
Check off the box next to “Restaurants” in the Power | Categories section of the form.
Click Save.
Result
The category is assigned to the location and appears on the location table.
The location with an assigned restaurant category. This view is showing fewer columns as the Screen Options was updated to removed unused columns from the table view.
User Action: Show Category Select On Front End
Click on Store Locator Plus® | Settings in the WordPress sidebar menu.
Change the Category Selector setting to “Single Drop Down”.
Click Save
On the front end, go to the page that has the [slplus] shortcode.
Result
The search form for the map should show a category drop down.
The front end page with the [slplus] shortcode, showing the category selection filter.
User Action : Filtering Locations With Category
On the front end, go to the page that has the [slplus] shortcode.
The base Store Locator Plus plugin and add ons are updated on a regular basis. Often the updates include security and bug fixes or fundamental changes that are designed to improve performance by reducing the memory and/or disk request load when your visitors are interacting with the map.
The most common reason your legacy add on stopped working is because it is no longer supported with the latest version of Store Locator Plus or vice versa
You may wish to choose to stay with your WPSLP Self Managed plugin and upgrade to the replacement bundled add-ons or switch to the managed MySLP.
Make sure you have a backup copy of the current version of SLP you have installed that IS working with your add on packs. We ALWAYS recommend that your site uses VaultPress or JetPack
Whenever you update the base plugin make sure ALL of your SLP add-on packs are updated to the latest version.
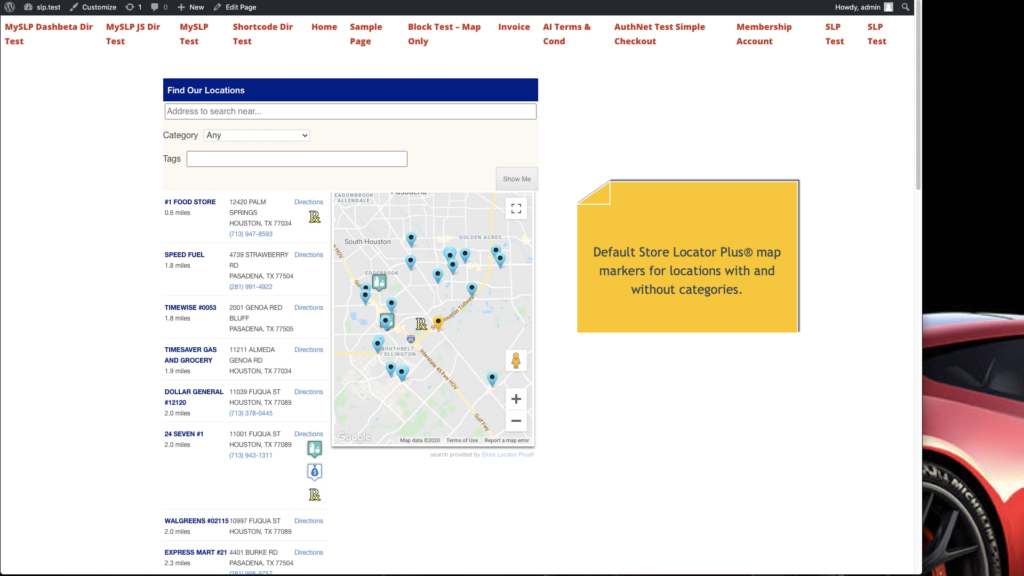
MySLP Professional and Enterprise level services allow for locations to be categorized. Each category for a location can have its own map marker associated with the category. These markers are then displayed on the map to mark the location. (This also applies for those customers using the WordPress SLP plug-in with the Power add-on or Premier)
However, some locations may belong to more than one category. In this case the map marker that is selected to be displayed on the map is determined by the RANK assigned to the category. If multiple categories have the same rank, or no rank, then the first category by alphabetical listing will be the one selected as the “main” category for rendering the map marker.
Default map markers when no category is selected.
Filtering Locations By Category
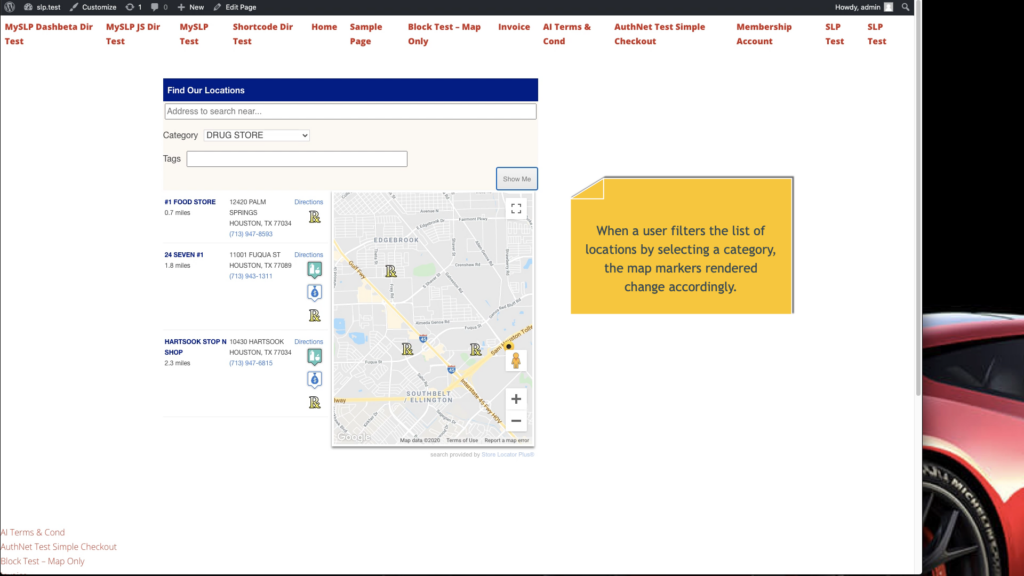
What happens when a user decides to filter the list of categories? Only locations that are within the selected category are shown.
If the location only belongs to ONE category, as is the case for the “#1 Food Store” in our example above, the choice is easy. Show the category map marker.
But what should be displayed if a location belongs to several categories, as is the case for our “24 Seven #1” location shown in the example above?
Prior to our mid-September 2020 release of Store Locator Plus® (or the Power 5.5.7 add on for our legacy WordPress plugin users), the marker for the “24 Seven #1” location would be the highest ranked category, which is the convenience store marker.
With the mid-September 2020 release, however, this behavior has changed. The map marker displayed will be the one that matches the filter the user selected.
Since our mid-September 2020 release, category filters change the map markers to match.
Multiple Location Categories
What about Store Locator Plus® interfaces that allow users to select more than one category, such as interfaces that allow checkbox selections for categories? Markers will be chosen from the markers for the selected categories only. If a location matches 2 or more of the categories, the highest ranked OF THOSE SELECTED will be displayed on the map.
This is different from earlier versions of Store Locator Plus® where it would always display the highest ranked category map marker, even if it was not part of the checked list of categories.
With built-in custom CSS rules now standard for most WordPress themes, version 5.4+ of Store Locator Plus® has dropped legacy CSS styles. Up to version 5.4 users could place a CSS file in the Store Locator Plus® plugin CSS directory and then use the Settings | View | Plugin Style to select that CSS file in place of the default “A Gallery Style”.
Adding The Style With Experience Add On
Copy the CSS from one of the legacy CSS stylesheets listed below an paste it into the Settings | View | Custom CSS box. This requires the WordPress Experience Add on.
Adding The Style With WP Themes
Custom CSS support is built into WordPress core and themes only need to tell WordPress they support that option to enable the functionality. Many modern themes now include this option. Go to Appearance | Customize | Additonal CSS and paste the CSS there.
Users of our MySLP SaaS offering don’t have to worry about this sort of thing. The built-in style gallery will suffice for most sites and those that need custom CSS can use the built-in CSS tools provided by platforms like Wix, Weebly, Squarespace, and more.
The directory listing option for MySLP makes it easy to provide a list of states in which your locations reside. The directory listing can be easily added to any Wix site by using the directory style presentation when embedding the MySLP code.
The Wix embed code presentation leaves a bit to be desired when it comes to formatting. When you drop an embed block into a Wix page it will often add far too little padding, is not centered, and does not default to a big enough height to display a list of locations.
Getting Started With The Embed Format
When using Wix we find it easier to format the MySLP embed code by using the advanced editor.
Start by adding an Embed , HTML block into the page. Wix will drop this in a random semi-centered location on the page. Drag it down to an available space on the page.
Embedding an HTML object into a Wix site.
It is best to set the embed block to be 100% the width of the content. The gutters should be marked with a dashed line to show the left/right main content width. Stay between the gutters.
Set a default height tall enough to show the listing. An embed box height of 800 is a good start.
Relocate the embed HTML box to the white space of the page. You may need to add the white space to your Wix page by tweaking the height position (Y) of the elements on your page.
Click on the embed box and look for Enter Code on the top-left corner of the box.
Enter the MySLP SaaS embed code, make sure you add <style> section and include a data-presentation=”directory” attribute on the embed script to get the directory listing in place of a map of locations.
Enter the embed code and related <style>..</style> section as noted below.
Example Embedded MySLP Directory Code
The following embed code can be added to ensure CSS styling is included along with the JavaScript-based directory functionality of MySLP.
You can add custom CSS rules to WordPress to style your directories and location maps without having to wait for a custom Store Locator Plus® style or a theme that supports full CSS rules. WordPress has a built-in CSS customization tool that applies to all pages on the site.
You can use this custom CSS tool to do things like format the MySLP SaaS, or WPSLP plugin, directory listings.
How To Add Custom Rules
Login to your site as a site administrator.
Click on the Customize menu entry in the admin toolbar.
Click on Additional CSS in the sidebar.
Enter a fully qualified CSS rule.
This example is used to style the MySLP SaaS directory listings on the site. MySLP is a pure JavaScript embed implementation and requires the site hosting the embed to add extra CSS rules. The output changes the MySLP Directory state selector from a vertical list to a horizontal list as shown on the MySLP Directory page.
Our software-as-a-service platform, MySLP, runs on many different web builders and mobile frameworks. If you are using MySLP you cannot easily create pages that contain the [slp_directory] shortcode used in the Store Locator Plus WordPress plugins. There is another way to do this with our SaaS offering.
This new MySLP feature makes it easy to add a directory of locations to any platform. Display your location directory on Weebly, Wix, WordPress, or any website management platform that supports JavaScript.
The Embed Code
When using MySLP you typically add your locations and set your map experience properties. The next step is to go to the Generate Embed page on your account dashboard to get the JavaScript needed to display the locator search form and map on your site.
Standard MySLP output with default embed code.
Embed Code For Directories
When displaying a directory, you normally do not want the location search and map to appear. You can use the data-presentation attribute with your script to tell MySLP what type of location presentation you would like to show on your site.
Here is a full script example from our test server — you can see where we added data-presentation=”directory” to the standard embed script.
Adding data-presentation=”directory” to the script will use the directory style presentation where the <script…> embed appears versus the standard MySLP output.
Default Directory Presentation
The default setup for the directory style presentation is to show a list of states (or provinces) in a list.
Clicking on a state will show a list of locations using the results layout configuration you have set for Store Locator Plus®.
By default there is no search form, map, Store Locator Plus® tagline, or distance displayed.
An example of the Directory output with MySLP SaaS showing results after clicking the FL link.
Styling The Output With CSS
You can style the directory output by manipulating the CSS on the site where the script has been embedded. The method for adding custom CSS will depend on the platform you are using to host your site.
Store Locator Plus uses the built-in WordPress internationalization and localization tools to translate the interface text into various languages. Store Locator Plus plug-in is part of the WordPress Translate project. You can contribute translations for the base plugin at the Store Locator Plus directory at WordPress Translate.