Q: Can a store or location have more than one category assigned to it?

Can the stores be categorized by more than one taxonomy? Not multiple tags in a single taxonomy, but multiple tags from multiple taxonomies?

A: Stores only have one categorization class – the store page taxonomy.
However, WordPress Taxonomies are hierarchical. Therefore, you are able to assign all the attributes you need to your locations and use the parents of the branches to drive the user experience. The Power add-on has several UX components such as “drill down” menus that allow users to select a specific category by selecting a parent first then a child.

Adding Locations with additional features

If you have any of the Store Locator Plus featured Add-ons such as Power, Experience, or Premier add-ons , or if you have the MySLP Saas Professional or Enterprise level plan you will see additional sections when Adding (or managing) a Location.

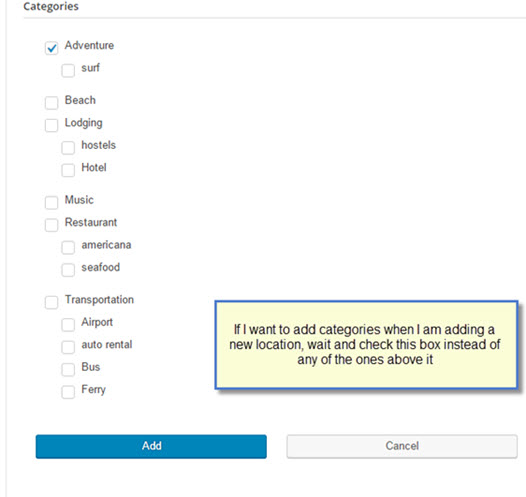
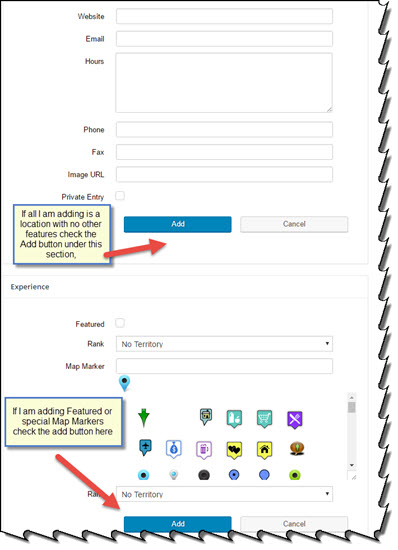
You can opt to fill in all the rows and info that determine the Location and geocoding and hit Add button if you are done entering information. Or you can opt to continue to the next section, whether it be featured, tags, categories, or other functions that are in separate sections on the Location Add Tab.Click the “Add button” at the bottom of the next section instead.

For example, I want to add a location that also is going to have a category assigned to it. I have the latest version of the Power Add-on activated. After adding all the Location information, I do not click on the Add button under the location information but continue on down to the next section called “Power” and add whatever pertinent information I wish to add there. Once I am satisfied and have no additional data to add, I click on the Add Button under the Power section of the Locations Panel to create the location that I have just added.

The category or other additional data you just associated will appear when you review the Locations Page.When to click the add buttonaddlocationa nd acategories

How to Export Locations to CSV file

Bulk Export

You must have the MYSLP/Professional level or the WPSLP plug-in with the Power add-on .

  1. Go to the Store locator Plus side bar menu, select the Locations tab
  2. Select from the drop down  menu under BULK actions , select export  Download to CSV.
  3. You may select  the locations by clicking either individually and Apply  or click on the action bar and select the Apply /  ALL button or you may  filter what you wish to export. Screenshots, the first one is the Plug-in  menu
    Above shown is the WPSLP plug-in with Power add-on
    SLP SaaS bulk export with Professional level plan

    SLP SaaS Action bar to check off All

Results Order by display

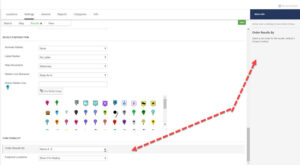
The Store Locator Plus default is to show the order of the  results below your map by distance, i.e. closest to the searched address  listed first.   With the Experience Add-on or the Premier Add-on the  “order by” options  allows you to display the results in a different order.  With the Experience add-on (if you are using WordPress SLP) or the Professional Plan (if you are using the MySLP Subscription) the results order by options  are  under your Settings/Results/Panel

  • Closest list the closest to the search address or center of the map (this is the default)
  • A..Z- alphabetical sort of locations.alphabetical sort of locations
  • Random- random order of locations, changes on each search
  • Featured, Rank, Closest
  • Featured, Rank, A..Z
  • Featured, Closest
  • Featured, A..Z
  • Rank, A..Z
  • Rank, Closest

    Experience add-on allows you to change the order of the results


GENERAL END USER LICENSING AGREEMENT (EULA)

About Licensing Our SLP Plugin and Add-ons

One question that comes up often is about licensing for multiple sites. The base Plug-in  does not require a multi-site license. We decided we’d rather keep the license part of the code light so that your server spends more time on the important stuff than checking to make sure you are in compliance. However , in order for the add-ons to work on a Network-Active Multisite WordPress configuration , an active Premier subscription will be required.

The general rule of thumb to ensure stability of the product:
Install one license PER BUSINESS site

alternately ,

with Network Active Multisites you must purchase a Premier subscription.

The policy concerning a licensed use of the purchased (also referred to as  Premium) add-on packs for a Network Active multisite install requires an active Premier subscription.

We hope you enjoy our plugin & wish you success in your business!

The Legal EULA

Charleston Software Associates releases a variety of products to the general public. Unless specified otherwise these products are licensed under the following End User Licensing Agreement (EULA).

Terms

The following license terms are between the customer and/or user of the application (you) and Charleston Software Associates, LLC (CSA).

The license terms cover any application or program (Program) that is in your possession or that is being accessed by you and has been produced in part or in whole by CSA.

Ownership

THIS PROGRAM IS LICENSED, NOT SOLD. BY INSTALLING, COPYING OR OTHERWISE USING THE PROGRAM, YOU AGREE TO BE BOUND BY THE TERMS OF THIS AGREEMENT. IF YOU DO NOT AGREE TO THE TERMS OF THIS AGREEMENT, YOU ARE NOT PERMITTED TO INSTALL, COPY OR USE THE PROGRAM. IF YOU REJECT THE TERMS OF THIS AGREEMENT WITHIN THIRTY (30) DAYS AFTER YOUR PURCHASE, YOU MAY REQUEST A FULL REFUND IN WRITING OF THE PURCHASE PRICE AND YOU MUST UNINSTALL ANY COPIES. FOR ANY FREE APPLICATIONS YOU MAY REJECT THE TERMS BY UNINSTALLING THE PROGRAM OR, IN THE CASE OF A HOSTED APPLICATION, CEASE ACCESS TO THE HOSTED APPLICATION.

Liability Disclaimer

The Program is provided to you “as is” by Charleston Software Associates, LLC (CSA).

THERE IS NO WARRANTY FOR THE PROGRAM, TO THE EXTENT PERMITTED BY APPLICABLE LAW. EXCEPT WHEN OTHERWISE STATED IN WRITING THE COPYRIGHT HOLDERS AND/OR OTHER PARTIES PROVIDE THE PROGRAM “AS IS” WITHOUT WARRANTY OF ANY KIND, EITHER EXPRESSED OR IMPLIED, INCLUDING, BUT NOT LIMITED TO, THE IMPLIED WARRANTIES OF MERCHANTABILITY AND FITNESS FOR A PARTICULAR PURPOSE. THE ENTIRE RISK AS TO THE QUALITY AND PERFORMANCE OF THE PROGRAM IS WITH YOU. SHOULD THE PROGRAM PROVE DEFECTIVE, YOU ASSUME THE COST OF ALL NECESSARY SERVICING, REPAIR OR CORRECTION.

Termination.

This License Agreement is effective until terminated. You may terminate the License Agreement at any time by (i) permanently destroying all copies of the Program in your possession or control; (ii) removing the Program from your long term storage device; and (iii) notifying CSA of your intention to terminate this License Agreement. CSA may terminate this Agreement at any time for any reason or no reason. Upon termination for any reason, all licenses granted herein shall immediately terminate and you must immediately and permanently destroy all copies of the Program in your possession and control and remove the Program from your long term storage device.

Copyright

All programs referencing this license are Copyright by Charleston Software Associates, LLC. All rights reserved, worldwide.

Store and Category Manager

Store and Category Manager interface is available if you have the  Power  Add-on installed (for WPSLP users) or have the MYSLP Professional level or higher. You will see a tab “Categories” in your Store Locator Plus User Interface.

Under side menu MYSLP/StoreLocatorPlus menu

Once you open the Category Tab  you can begin to add categories and slugs or edit existing.  Set Markers and Icons per category (optional) if you want those to appear in place of map markers.  A Bulk action drop down to delete some or all categories is  at the top of the category box.

Settings/Search

You can choose to show the categories that you have created in a drop down menu as part of the search form.  There are additional category selector options available for WPSLP premier subscribers  or MYSLP Enterprise subscribers (example see Checkbox selector). You can add text as a label that will display  at the top of the categories drop down menu, or you can leave blank.  You can also add text for the category select box that will appear in front of the category drop down on the user interface.

Hide Empty Categories Setting

For WPSLP Power add-on users . Do NOT turn this on unless you have   Pages enabled.

Settings/Results

If you want the category icons to appear in results list check off Category Icons

Categories

The ability to categorize your locations using the WordPress category (taxonomy) system.  The Categories Manager (Formerly known as Tagalong) is part of the Power Add-on   for  WPSLP self managed customers, and available for the MYSLP Professional or higher plans)  It builds on the Store Locator Plus store_page taxonomy that is also used with the Pages portion of the Power Add-on (for WPSLP stand alone).  Build a “simple flat list” of categories or a hierarchical (parent/child) category structure. Once you’ve categorized locations you will find other added benefits on the user interface.

Radius Behavior

Store Locator Plus  Radius Behavior is set to “always use” in the base plugin or Advance level subscription for SLP SaaS

For additional options you would need Professional level  and /or higher for MySLP/SLP SaaS  or the Experience add-on for the WPSLP plug-in  which allows you to extend the functionality beyond the basic “Always Use” setting.  This setting impacts how the radius selector is employed and how locations are filtered before being displayed to the user.

The map radius is set under the Settings /Search tab and the results (after search) is found under the Settings/Results tab”Initial Search radius”.  The search radius selection options presented to the user in the drop down menu is set under the Settings / Search tab  panel.

How to upload and install your Word press Store Locator Plus and Add-Ons

Obtaining SLP  Add On Pack

Note  This page does not apply to our SLP SaaS subscription customers.   All updates for those customers are taken care of by us.  SLP SaaS is also referred to as MySLP. It is not a plug-in.  It is a managed Software service.  No need to worry what version you are on.

All add-on packs are available from the WordPressStore Locator Plus website.   Power Add-On ,  Experience Add-on , or you can purchase a Premier Subscription that provides access to all of the add-on packs as well as preferred access to the Premier support forums, pre-release products, new features and functionality that is  available only to subscribers.

Note: If you purchase the  Power or Experience add-ons as an upgrade to your existing  (Legacy) add-ons, the legacy add-ons will automatically be deactivated. Delete the legacy add-ons.  First “always have a full backup of your site”  We strongly recommend looking into the WordPress backup, or   Jet Pack.   One of the features included , besides real-time incremental backups of your site with restore points, is the ability to restore the site to an alternate site

<!–more–>

Install An Add On Pack

SLP version 5.10 and above are not listed in the WordPress Plugin Directory.    Ditto any add-ons you purchased from our Store front . As such the first time you add the plug-in it will  need to be installed via the below  installation process.

  • Login To Your Store Locator Plus  Account
  • Download the latest zip file version
  • Login to your WordPress admin panel for your website.
  • Go to the plugins sidebar menu.
  • Select Add New.
  • Select Upload.
  • Browse to your downloaded zip file.
  • Click Install now.
  • Activate

Updating An Add On Pack

Once installed a query from the WordPress Admin Panel communicates with the Store Locator Plus servers and a message  or red line will be shown as updates are available.  Occasionally, the WP server times out before it gets to the SLP plugin servers. Use the check again tool in the WP Admin sidebar or check the versions at the Store Locator Plus home page.
WP check again

Some third-party plugins and WordPress themes can prevent the update notice appearing from the Store Locator Plus server.   It is prudent to visit the Versions Page and only if necessary, perform a manual update.  

You should perform updates on your test site or a staging site first to avoid downtime or potential  issues effecting your production (live) site. You should always have a recent back-up to restore to. The safest way to do manual updates, follow these steps

Deactivate the plugin you are updating
Delete the plugin
Go to Plugins | Add New
Select Upload
Upload the latest release zip file
DO NOT click the Activate button
Go to Plugins on the sidebar
Check off the plugin you just installed
Go to bulk actions and select activate